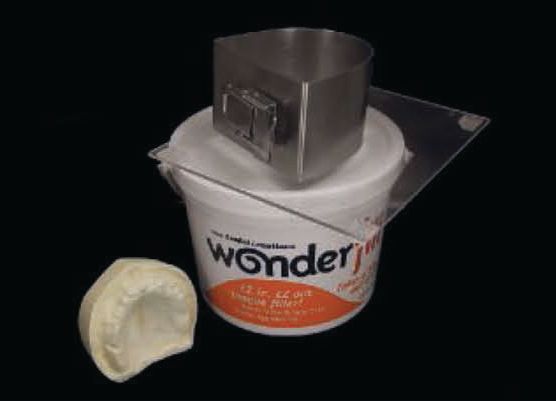
The simple and effective way to produce models in the lab
Don’t let its lack of sophistication fool you into believing this product has no value. That should be the “tag line” for a pair of products I stumbled across last year and started using in my removable prosthetic laboratory shortly afterward.

The products I am referring to are Dental Creations’ Wonderfill and its counterpart the Wonderformer.
Like most laboratories I am always looking for ways to remain accurate, save time and simplify techniques that are common and necessary to produce a quality end product. Conventional boxing and beading of impressions is a tedious technique that must be performed to complement and maintain the clinical efforts to impress border depth and thickness (border mold), and transfer those dimensions to a master model. Inversion of the impression in this technique also ensures the stone poured into the boxed area is intimate to the impression by means of gravity.
The common, time-intensive technique uses rope wax, sticky wax, and boxing wax to establish a land area, imitate sulcus, and a box to hold the stone pour together. The technique balances on the adhesion tenacity of the wax to the impression material, as well as the speed and dexterity of the technician in using and melting multiple waxes together to fabricate a “sealed” box into which lab stone is poured. Generally it takes about 20-30 minutes to prepare using the conventional wax method.
A second look
Over the years I had seen ads for the product Wonderfill but always thought of it as only tongue filler. While attending the 2011 FDLA Southern States Symposium, I noticed Dental Creations was offering free samples of Wonderfill to attendees. I remarked when handed the sample that the last time I used the product was with another sample I used to fill a tongue on a lower model. I mentioned it was a nice but rather one-dimensional product. At that point I was asked if I knew that boxing impressions in 5 minutes was possible when using a newer product, the Wonderformer, along with Wonderfill. Naturally, I said, “Tell me more.”
What I found was the real game changer for Wonderfill comes from a complementary product: the Wonderformer, which when used with Wonderfill becomes an accurate, cost effective, time saving “system” for fabricating boxed impressions. The form is a latching metal box or former which, when used like a cookie cutter along with Wonderfill, boxes an impression that is ready to pour in 5 minutes.
The benefits of boxing and beading impressions include:
- Replicates border molded areas of impression in shape and width
- Maintains border dimensions during flasking by providing uniform land area
- Ensures intimate adaptation and condensing of poured stone to impression
- Controls the base thickness of master models
Since realizing the accurate, cost effective, time and material savings of these products when used together, versus the time intensive conventional method, I have started boxing all the impressions in my lab-regardless if they are border molded or just for an opposing model-to take advantage of the esthetic and accuracy of pour aspects this technique and these products lend.
I also like having the ability to scale production of boxed models up or down without large consumption of hours in a day to do so (Fig. A). The conventional method for 11 models based on 25 minutes each is about 4 hours. The “Wonder” method for 11 models based on 5 minutes each is about 55 minutes.
The technique
01 After sterilizing the impressions, mark the impression borders of 3-4 mm (Fig. B).
02 Make a patty of Wonderfill on a 5x5 plexi or similar approximately 1” thick and wider than form/10 oz.
03 Press the impression intaglio up into Wonderfill up to the marked borders with the ridge parallel to the floor (Fig. C).
04 Position the Wonderformer centered over impression and press down in a cookie cutter fashion (Fig. D).
05 Peel away excess material and use it to backfill any areas that may have pulled away from the sides of the impression or form (Fig. E).
06 Tamp the Wonderfill flat and up to the marked border line. I find a toothbrush handle works well for this (Figs. F and G).
07 Lift and place the entire base and form on a vibrator, fill with your stone of choice and allow to harden.
08 Once the stone is set, unlatch the Wonderformer, separate the Wonderformer and Wonderfill from the impression, and pull off any Wonderfill still adhering to the stone. Wonderfill will prevent full drying of the stone (land areas), so after removing Wonderfill allow another 15 minutes for the model to cure. Use a model dryer for faster results (Figs. H and I).
Practice Tip: Do not leave boxed and poured impressions made with Wonderfill longer than time for stone to set up, and do not allow to stand overnight in the Wonderformer.
09 Pick off any adhering stone on the Wonderfill and return remainder to its container and reseal. (Fig. J).
10 Wash off any remaining Wonderfill on the model surface. It’s water soluble and non-staining making this simple to accomplish before trimming the models to width and thickness specifications using a trimmer and knife (Fig. K).
11 The completed model displays border definition and detail (Fig. L).
This technique makes it simple to create master models with proper dimensions including a width of 15-16 mm at its thinnest point, a land area width of 3-4 mm and a uniform 2-3 mm sulcus depth (Figs. M, N and O).
About the author

Tom Zaleske is Benchtop Editor for Dental Lab Products. The owner of Matrix Dental Laboratory in Crown Point, Ind., he has more than 25 years of experience in removable prosthodontics and regularly lectures on providing high quality service to dentists and most importantly to their patients. He can be reached at matrixdental@comcast.net.