How to ensure a high-quality impression on the first take
The concept of taking an impression may be simple, but there are a number of factors that can cause a less than an ideal impression, resulting in a retake that requires more time, more product, and ultimately, a dent in profitability.
The concept of taking an impression may be simple, but there are a number of factors that can cause a less than an ideal impression, resulting in a retake that requires more time, more product, and ultimately, a dent in profitability.
Related reading: How 3M ESPE cements make restorative dentistry easy
The problem:
Poor impressions/retakes Considering the number of potential complications that can arise during the impression-taking process, this article will detail how to avoid common impressioning issues. While every material and technique presents its own sensitivities, these guidelines can help clinicians consistently achieve high-quality impressions.
The solutions:
Proper preparation
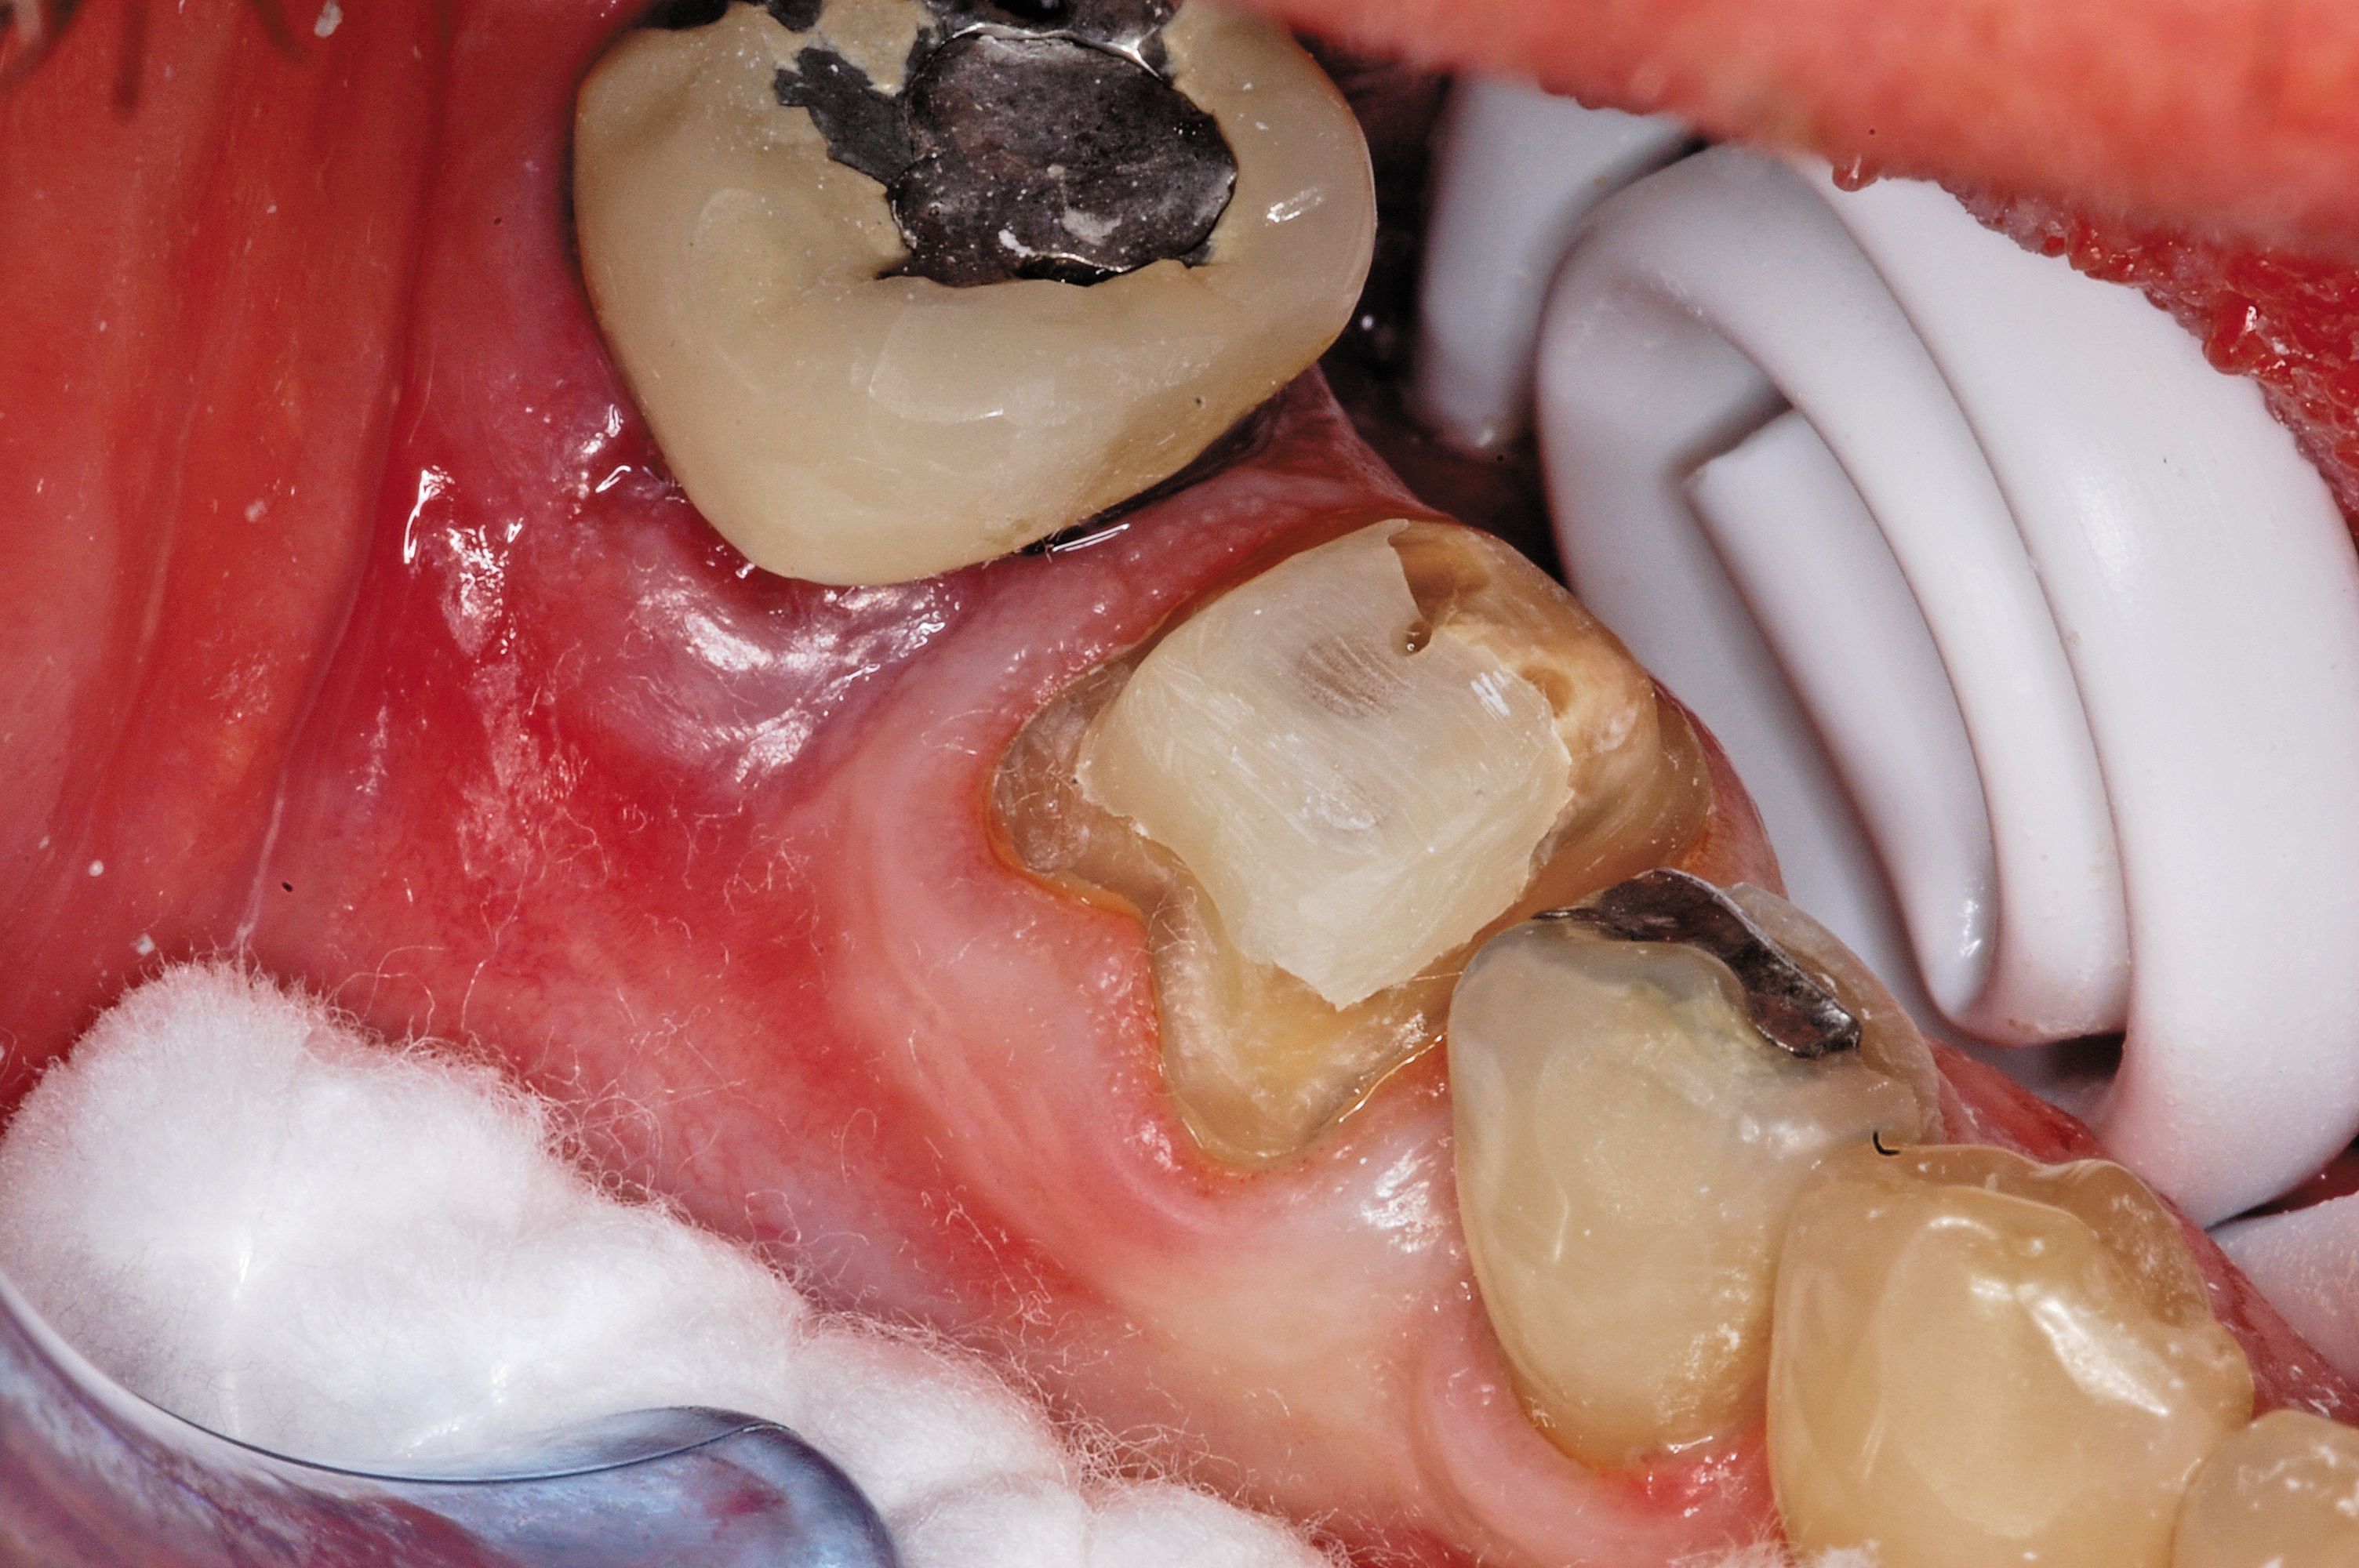
Ensuring a clear and moisture-free margin is an essential first step in capturing a detailed impression. First, retraction paste or cord should be dispensed or placed around the gum area to ensure a well-defined marginal area. Figure 1 demonstrates the clean margins achieved using a retraction paste (3M™ ESPE™Retraction Capsule) prior to the impression-taking procedure. In this instance, the product dispenser’s fine tip fits into the sulcus, providing improved interproximal delivery.
The retraction process is especially helpful with shallow preparations, and while this first step is not often discussed, it has an important impact on final treatment success.
The right take the first time
Begin by confirming there are no issues with contamination in the mouth, such as blood, saliva or chemical contaminants, which may be present if the surrounding gum area is not adequately displaced. To help keep the tongue displaced and prevent saliva from pooling, clinicians may elect to use a slide injector before taking an impression (Fig. 1).

Fig. 1: Prepared view of No 30 which displays well-defined margins
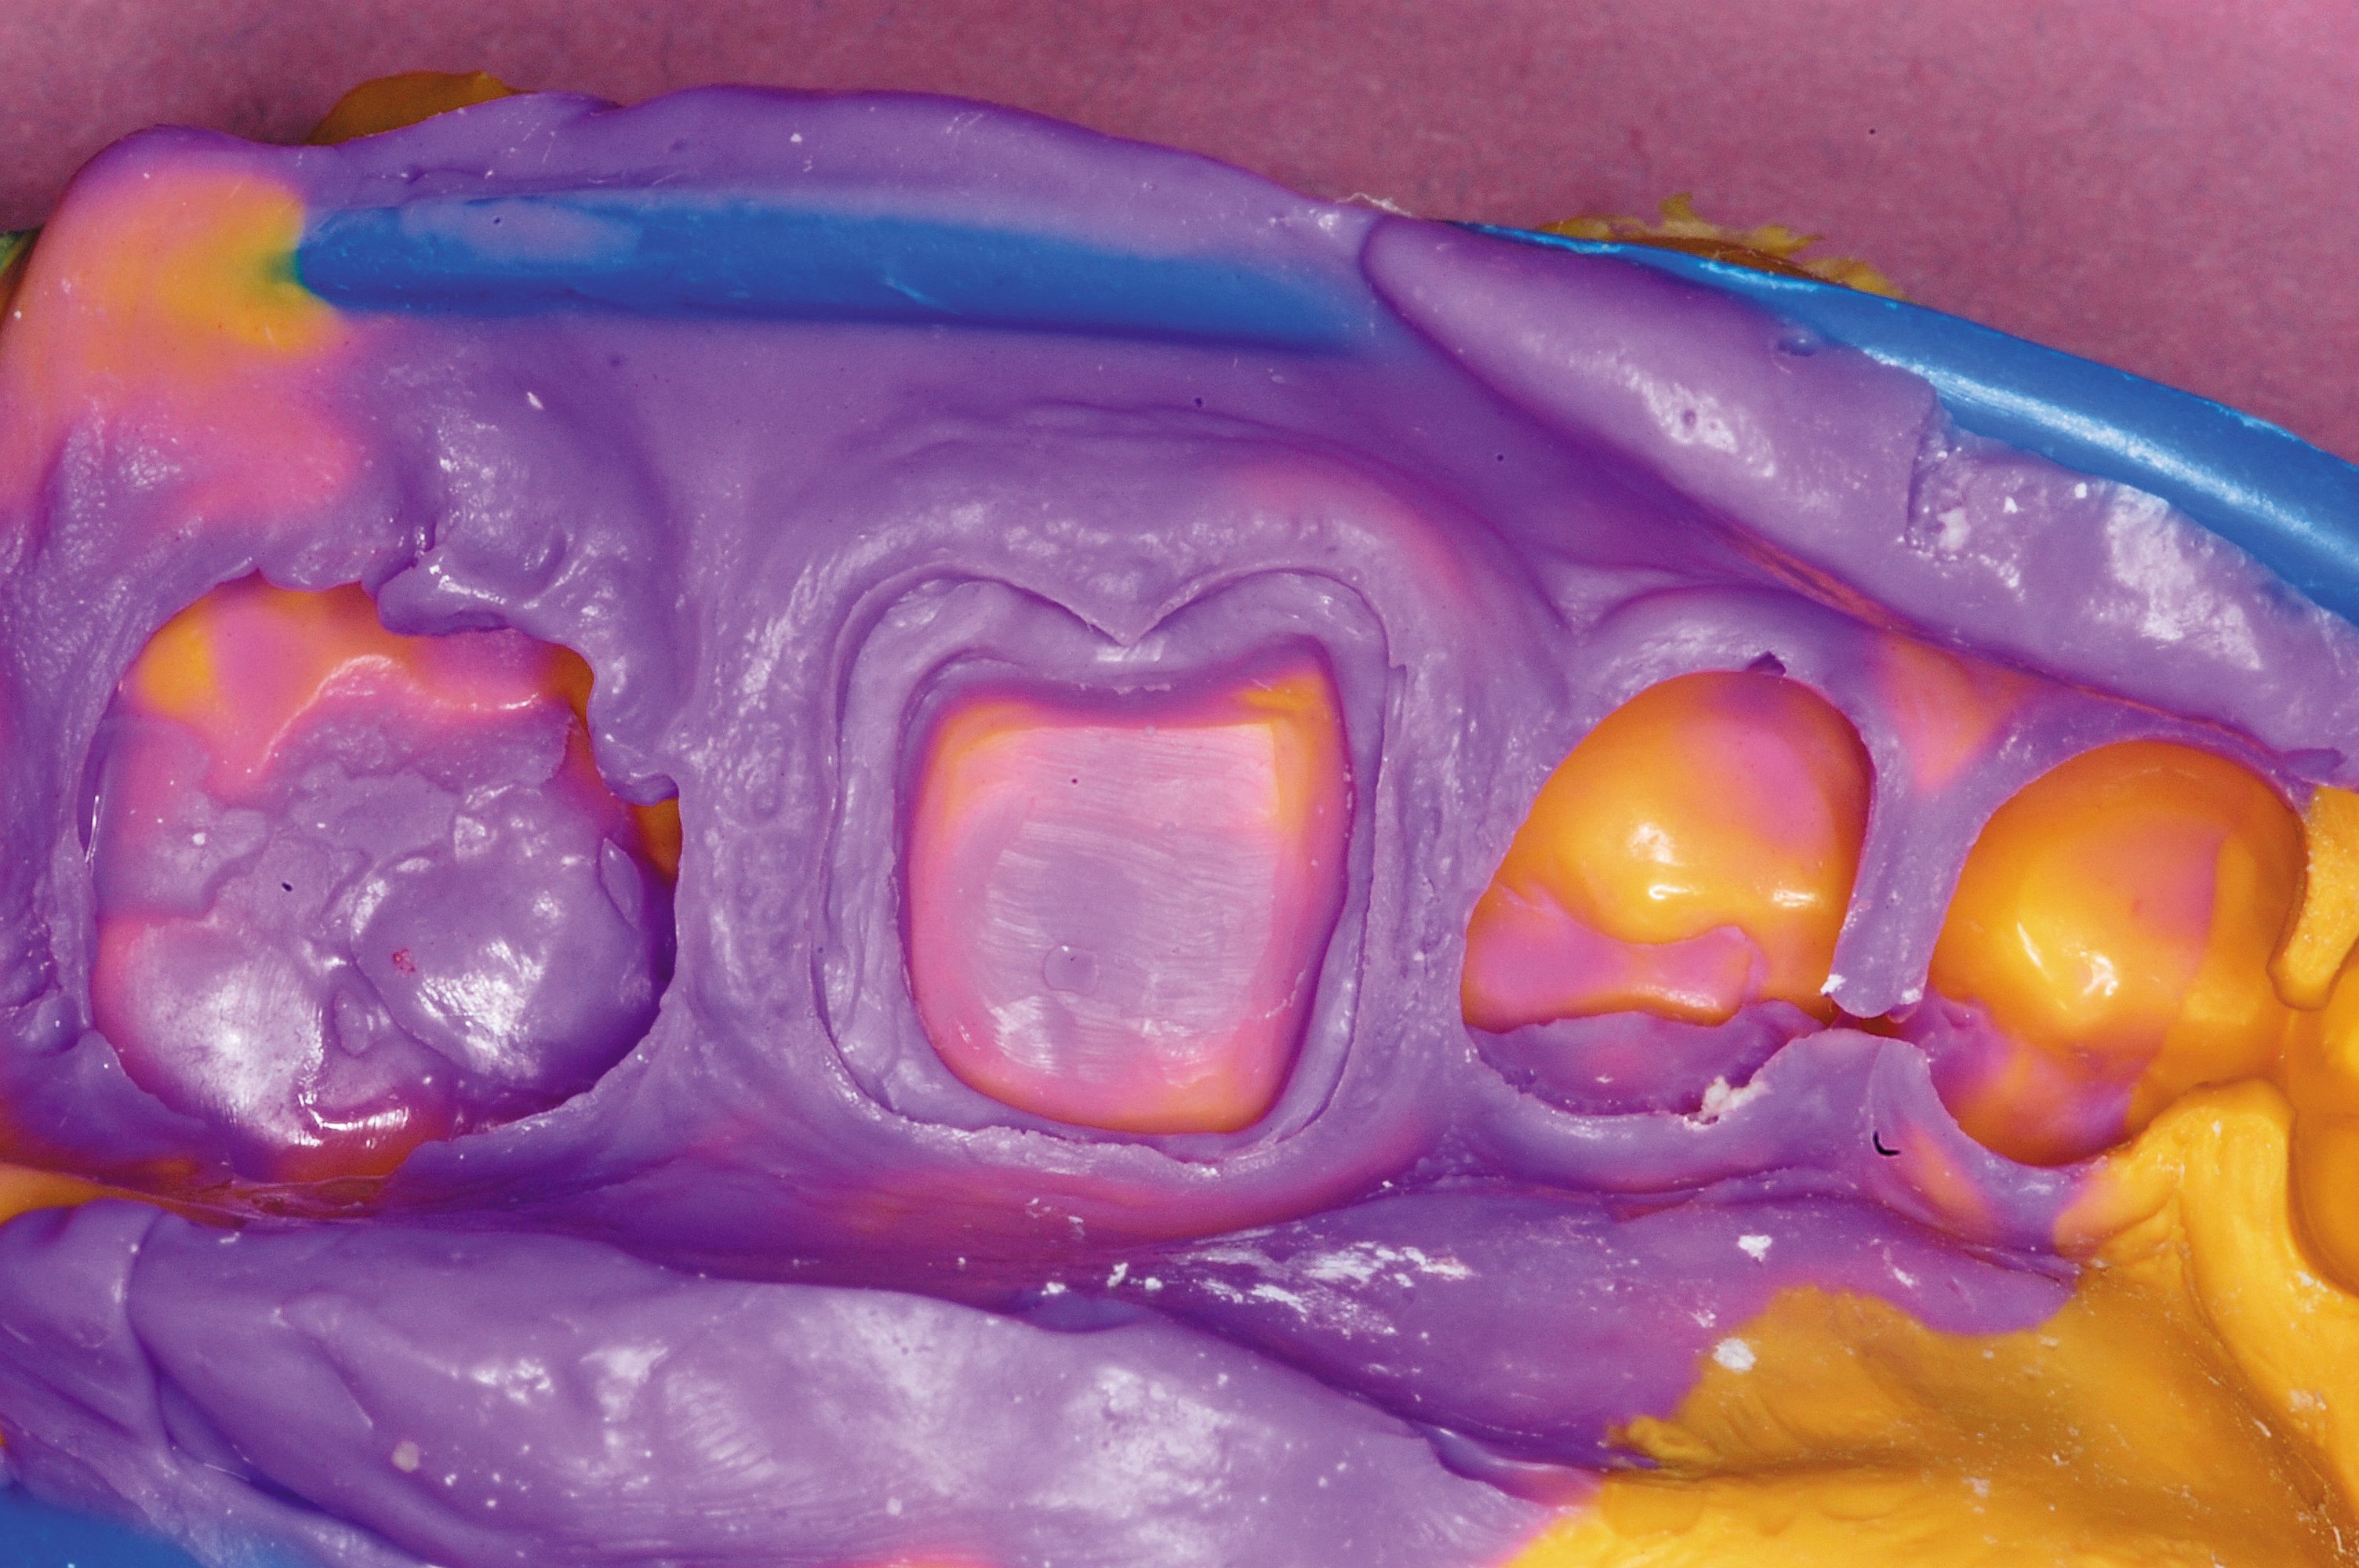
In this particular case, tooth No. 30 was prepared for a resin nano ceramic restoration (3M™ ESPE™ Lava™ Ultimate Zirconia). Once a dry and clean area was achieved, and soft tissue was not in contact with the margins, the impression was taken with a high-quality impression material. In this case, 3M™ ESPE™ Imprint™ 4 VPS Super Quick Impression Material (Fig. 2) was used, which takes only 75 seconds to set. This material is used in about 85% of our clinical workload, and its bright colors and sharp contrast ensures the detail captured in the impression is easy to see.

Fig. 2:The impression is void-free with superior detail capture
Advancements in impression materials such as faster set times and high color contrast allow clinicians to be more efficient, saving time and money in the long run. Finding a high-quality impression material that can be utilized in a number of situations also helps reduce inventory. While bargain options might be appealing, impression material is a product category that dentists cannot afford to shortcut.
Free E-Book: Benefits of portable X-rays in the dental office
Continue to the next page to learn more about the solutions offered by 3M ESPE Imprint 4.
Related reading: 3M ESPE RelyX cement is a 'slam dunk'
Understand material set times
A quick set time is an added benefit of an advanced impression material, but ensuring the product also allows for enough working time is critical to ensure a clinician’s technique is not compromised. Consequently, any good impressioning technique must include an understanding of the chosen material’s working and setting times.
An ideal impression material should flow quickly and effectively, allowing for plenty of working time to inject the light body material on the prepared tooth. A single-use intral-oral syringe (3M ESPE) is especially helpful to dispense the light body material, as it is lightweight, easy to use and significantly cuts down on product waste. The light body material should flow over the prepared tooth easily while being able to accurately adapt to the configuration of the tooth.
Simultaneously, the supporting heavy body material is dispensed into an impression tray and then into the mouth once the light body material has been syringed around the prepared tooth (or on top of the heavy body material, if a dental assistant is not available). To fill the tray quickly and easily, some clinicians and assistants prefer to use an automatic mixing unit such as 3M™ ESPE™ Pentamix™ Lite Automatic Mixing Unit, which allows for faster dispensing of material while ensuring ideal mix and control.
After 75 seconds, the stabilized impression was easily removed. It showed no voids, air traps, creases, folds or other defects, as shown in Figure 2. Thanks to a quick setting time, the entire impression-taking process was completed in less than 2 minutes.
For those impressions that do result in error, dentists are all too familiar with the pain of having to retake the impression altogether – a process that is not pleasant for the dentist or patient. By choosing a reliable impression material and mastering the technique, the need for a retake has been avoided in this case, resulting in a very accurate impression.
Related reading: How to cement posterior crowns with 3M ESPE cements [VIDEO]
Keep the patient in mind
Patient comfort can also be an issue when capturing an impression, so it is important that dentists do not work with an excessive amount of material that can potentially cause gagging. The tray should be full, but without excess material in the arch of the impression tray, ensuring optimal patient comfort.
The time to take an impression also matters from a patient perspective. Ensuring a fast and easy patient experience makes all the difference when they are debating scheduling their next visit.
Related reading: A look at 3M ESPE's Imprint 4 Impression Material and 3M True Definition Scanner
Continue to the next page to see the results of the final restoration.
Trending article: ADA 2014: Big launches and must-see products at the annual session
At the laboratory
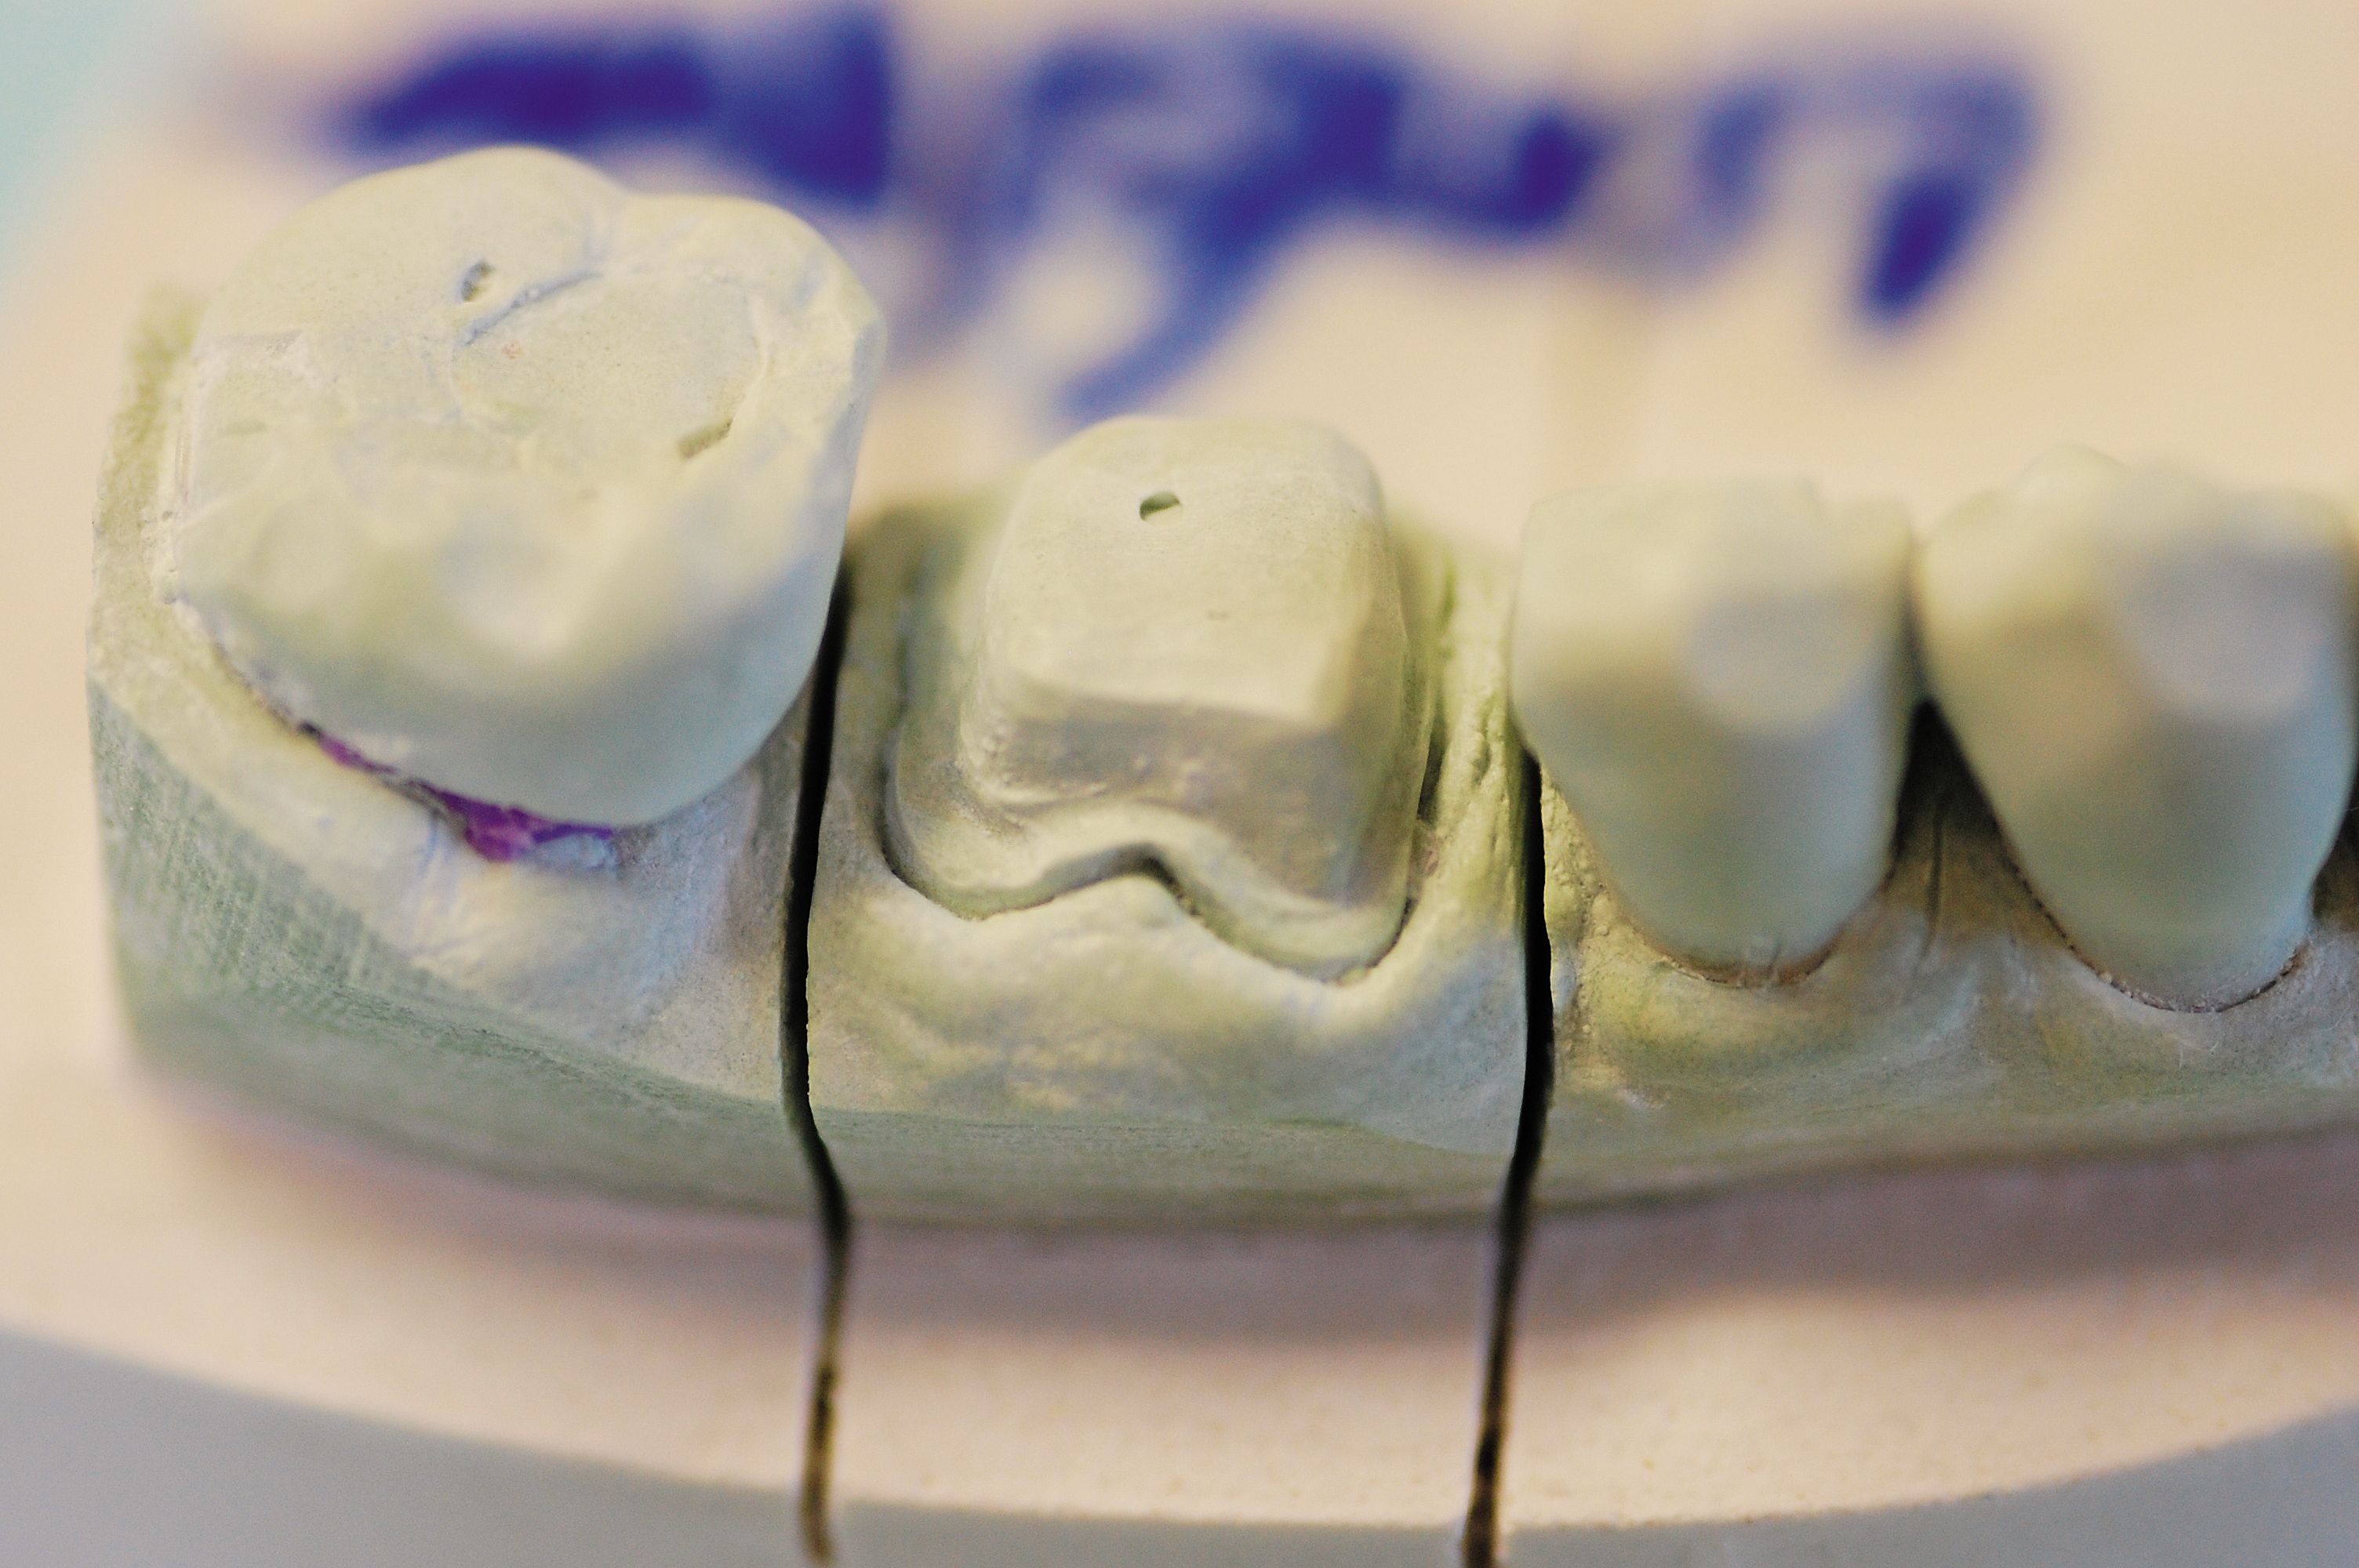
After removal of the impression, it was sent to the dental laboratory and a stone model was created (Fig. 3). The model reflects very distinct margins capable of being reproduced from the impression, critical for any type of restoration.

Fig. 3: A stone model of the prepared tooth
Completing the case
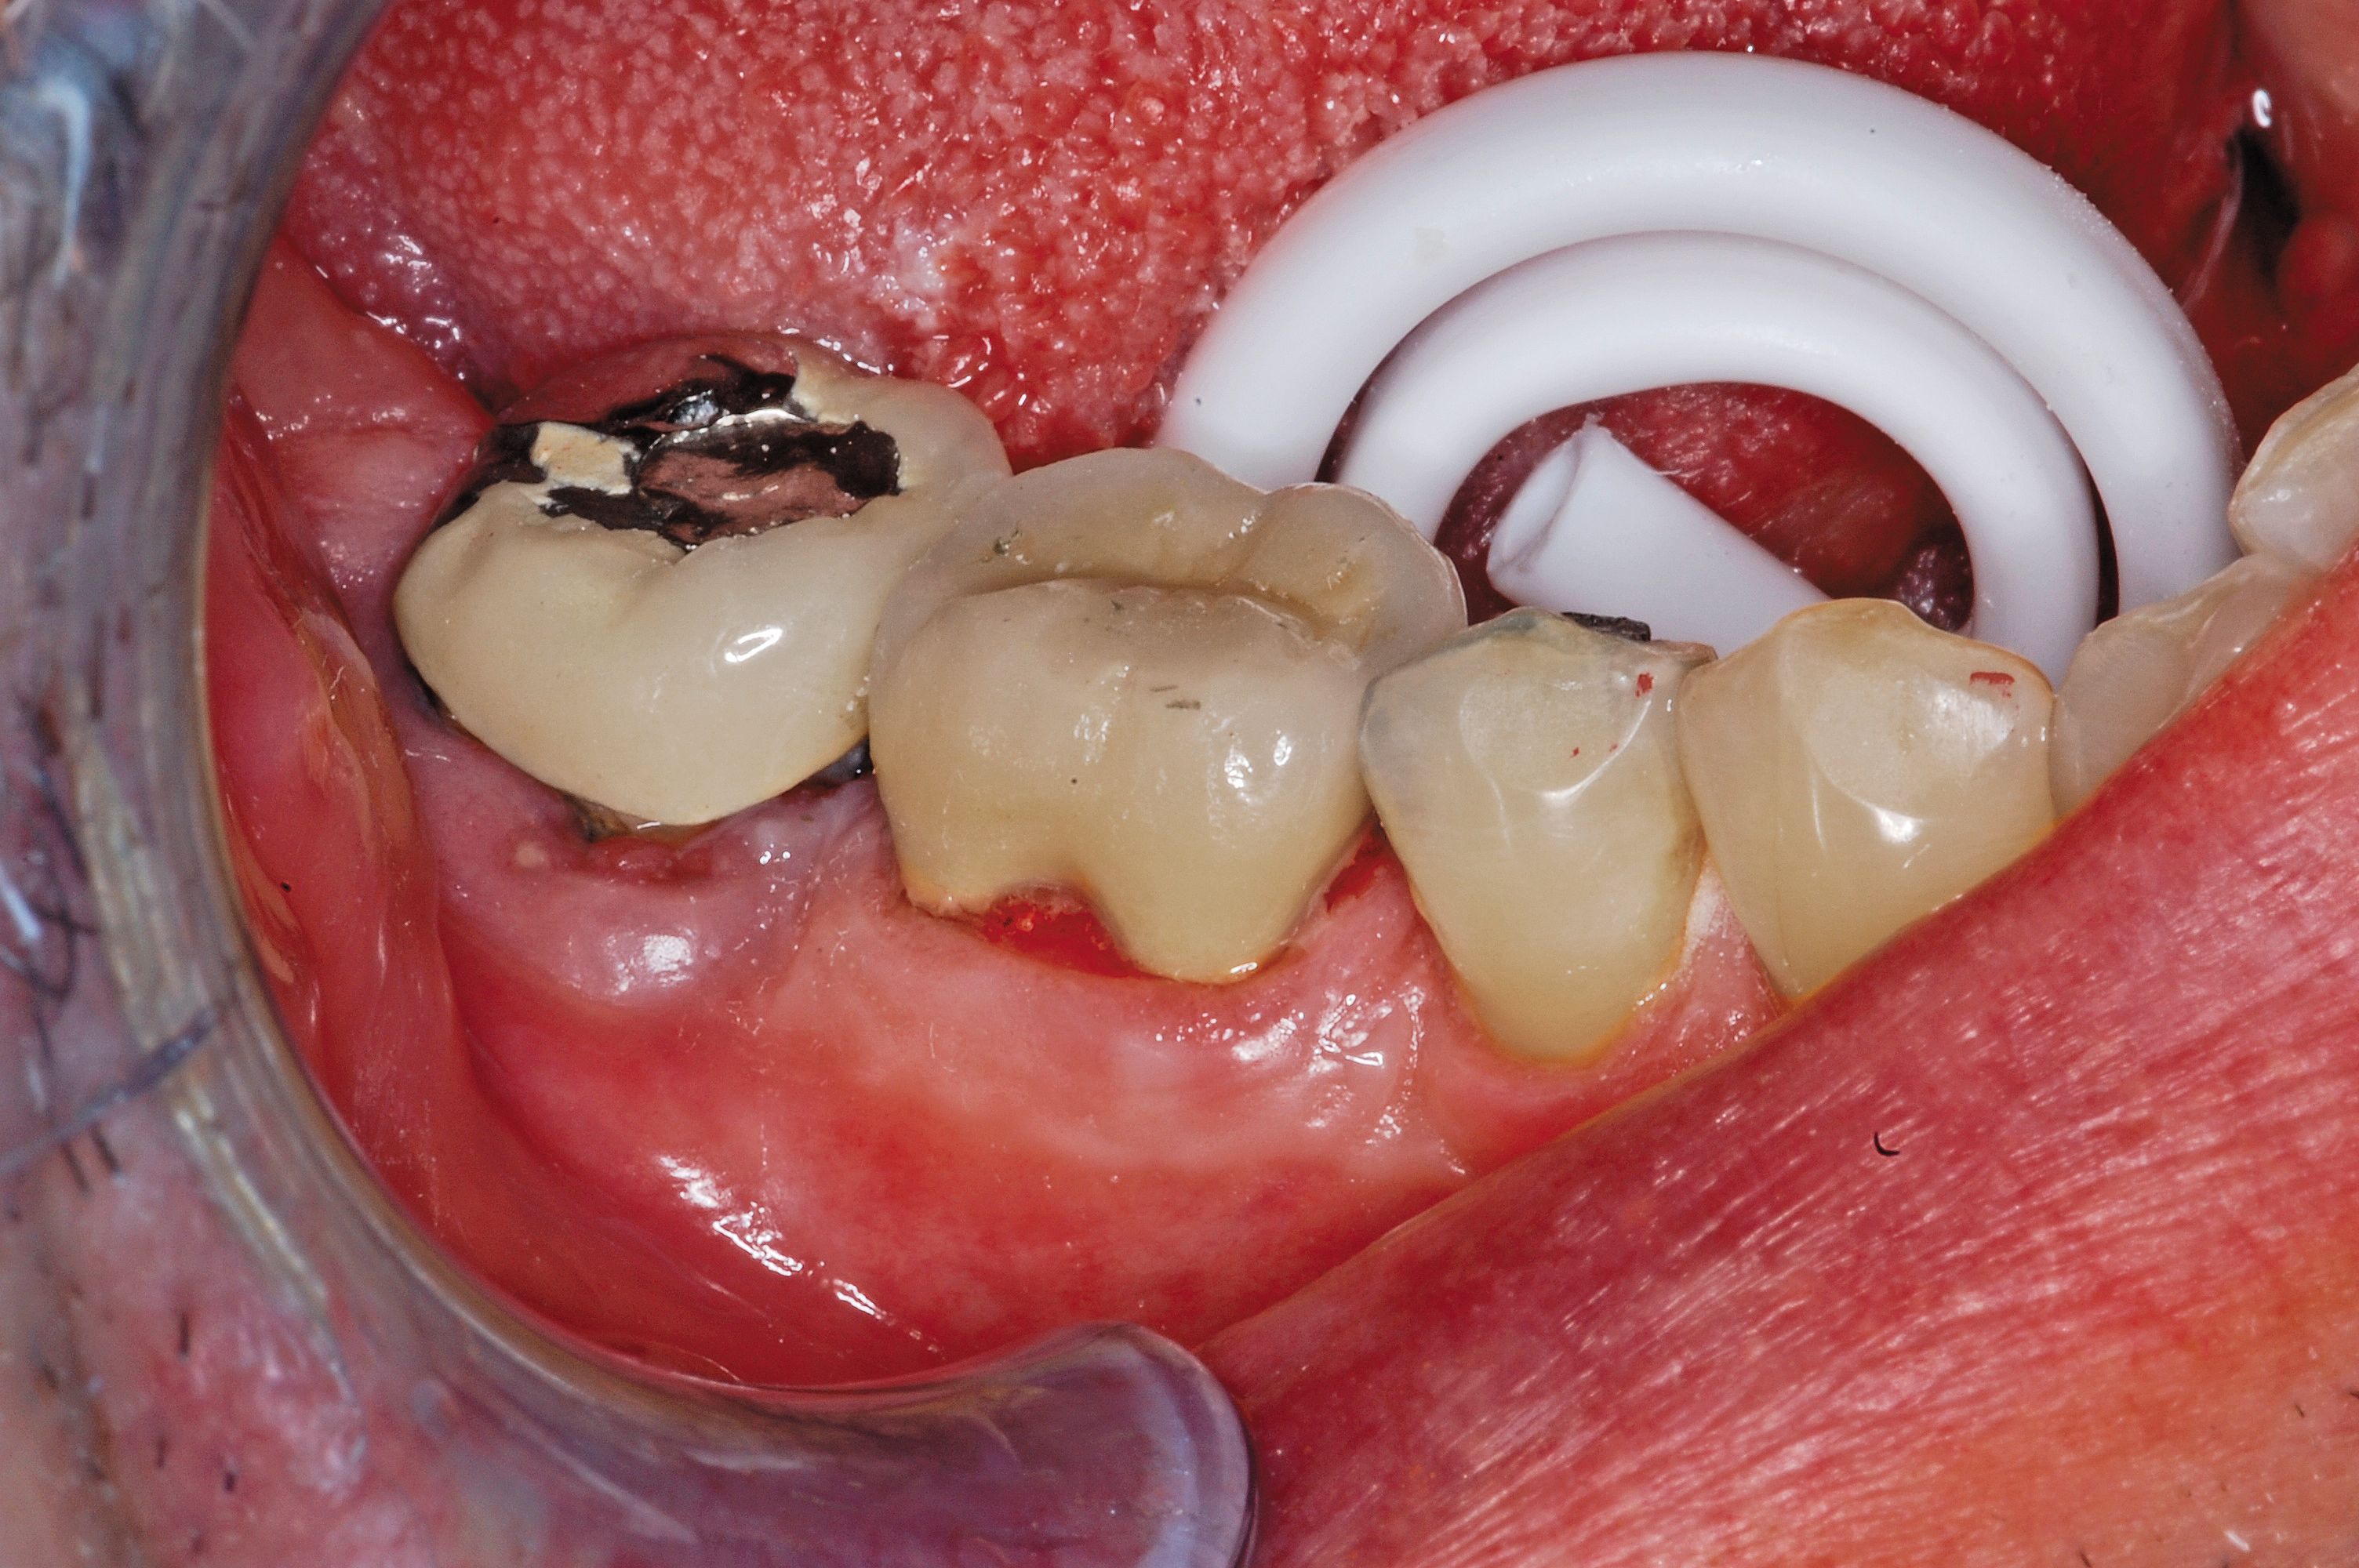
In this case, once the finished crown was returned from the lab, it was placed on the restored tooth (Fig. 4). There was no need to adjust the all-ceramic crown, as it fit perfectly. The restoration was durable and esthetically pleasing in the mouth, providing the patient both great form and function.

Fig. 4: The final seated restoration
High-quality material, technique
Getting an impression right the first time is often easier said than done. By choosing the best materials available, dentists can alleviate the stress of having to perform one or even multiple retakes. However, the most important part of an impression is the end result – in this case, a perfectly fitting crown leaving the patient happy and healthy.
Trending article: What dental professionals should be worried about besides Ebola
About the author
Dr. Braun graduated from the D.D.S. program at the University of Michigan and then earned a Masters degree in Prosthodontics. He has practiced in his hometown of Saginaw, Mich., for more than 25 years, and also has offered seminars at a great number of national and international meetings.
ACTIVA BioACTIVE Bulk Flow Marks Pulpdent’s First Major Product Release in 4 Years
December 12th 2024Next-generation bulk-fill dental restorative raises the standard of care for bulk-fill procedures by providing natural remineralization support, while also overcoming current bulk-fill limitations.